DecreasesBack to Search |
| Posted: Sunday, September 10, 2006 |
| Last Updated: Tuesday, June 11, 2024 |
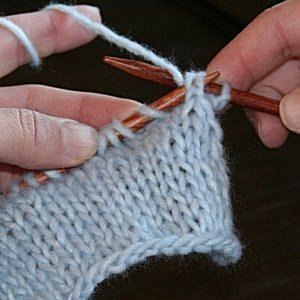
Decreasing on a Knit Row Ever wonder how you start knitting a hat at the bottom, but end up with fewer stitches at the top? Or what do to when a pattern says "dec 1 st at each end of the next 5 alt rows"? The answer typically lies in the reserved word "decrease." Although there are often a billion ways to do anything, I tend to use 1 of a couple different decrease methods on a knit row: K2tog & SSK. Why have 2 different methods, you ask? Because each of the methods causes the fabric to slant in a different direction; the K2tog slants to the right, while the SSK (and other decreases) cause the fabric to slant left. So, if you're working on the toe of sock, or on armholes of a tank top, you'll want to use the K2tog decrease on the left hand side of the work (so that it slants to the right - towards the middle of the work). And the SSK on the right hand side of the work (so that it slants to the left - towards the middle of the work). K2Tog - Knit 2 together (slants to the right)
Just like it sounds, the idea behind this decrease is to simply knit 2 stitches together, as if they were one. I use this decrease most often. Insert your right needle into both stitches on the left & knit them, imagining that these 2 stitches are really just one.
SSK - Slip, Slip, Knit (slants to the left)
Slip 1 stitch as if it knit, Slip 1 stitch as if to purl. Using the left needle, knit those 2 slipped stitches.
Decreasing on a Purl Row P2Tog (slants to the right)
P2Tog TBL - Purl 2 together through the back of the loops. (slants to the left)
Tip: Sometimes it helps me to write out how many stitches will remain at the end of each row. By writing this all out, you can start to see the pattern that is forming. You'll notice that every 4th row really means every other RS row (if the dec is on the RS, obviously). Once you realize this, you can stop counting 1, 2, 3, 4, etc. & just look at the previous RS row to see if you decreased there. Tip: If the above tip doesn't work for you (and it won't work for everyone), try placing a split ring marker (or a locking stitch marker) on your work each time you finish a row. When you get 4 of them on there, it's time to do a decrease row (assuming that you put a marker on for the decrease row also). Our very own, Laura (Jimmy), stars in this knitting instructional video about how to do K2tog and SSK decreases. We hope you enjoy it! |
| We hope you enjoy this article! This article and the associated photos are only for personal non-commercial use and are not for resale. All rights reserved. Permission granted by Jimmy Beans Wool and myKnitting.com to copy and share this article for non-commercial personal use. Users do not have permission to display on any retail or wholesale website other than www.https://www.JimmyBeansWool.com and www.myknitting.com without express permission from Jimmy Beans Wool. |


